Subscribe For Free Updates!

We'll not spam mate! We promise.

Monday, 4 July 2016

Reset your Nexus device to factory settings

Reset your Nexus device to factory settings

Reset your Nexus device to factory settings

You can remove data from your Nexus device by resetting it to factory settings. This is known as formatting the device, or doing a "hard reset." Usually, you'll want to try all common solutions to fix your issue first, before doing a factory data reset.

Important: Performing a factory data reset will erase all data from the device.
Before you start a factory reset

For a successful factory reset, you'll want to take these key steps before you start.
Step 1: Know a Google username and password for the device

To ensure that it's really you doing the reset, you may need to enter a Google username and password associated with the device.

    For Option 1 below, if you have a screen lock, you need the password, PIN or pattern. If you don't have the password, you won't be able to reset the device.
    For Option 2 below, you need a Google username and password associated with the device. If you don't have the username and password, you won't be able to use the device at all after reset.

Recent password reset

If you recently reset your Google Account password, wait 24 hours before performing a factory reset.
Exceptions

If you haven't added a Google Account to your device, or your device is running Android 5.0 or below, your device is not protected this way. In that case, you won't need a Google username and password to use your device after factory reset. See what version of Android you have.
Step 2: Back up your data to your Google Account

A factory data reset will erase all data from the device.

While any data stored in your Google Account will be restored, all apps and their associated data will be uninstalled.

Make sure that your data is backed up to your Google Account and that you're ready to restore your data.
Step 3: Plug your device in to a power source

Make sure to plug in your device before starting the factory reset. Keep it plugged in until the factory reset completes.

Performing a factory reset may take up to an hour depending on your device and available memory.
Step 4: Make sure you have an Internet connection

Make sure that your device is connected to Wi-Fi or your cellular network.

To sign in to your Google Account, you'll need to be connected to the Internet.
Option 1: Reset device from the Settings app

To factory data reset ("format") your device in the fewest steps, use the Settings app. (If you can't get to the Settings app, see Option 2 below.)

After following all the Before you start steps above:

    Open your device's Settings app Settings.
    Under "Personal," tap Backup & reset.
    Tap Factory data reset and then Reset phone or Reset tablet.
    If you have a screen lock, you'll need to enter your pattern, PIN, or password.
    When prompted, tap Erase everything to erase all data from your device's internal storage.
    When your device has finished erasing, select the option to reboot your device.
    When you're done, restore your data.

Option 2: Reset device in Recovery mode

If you can't open the Settings app because of device issues, you can use Recovery mode to factory data reset ("format") your device.

Tip: If your device becomes unresponsive at any point, you can restart it by holding down the Power button for several seconds.

After following all the Before you start steps above:

    If your device is on, turn it off.
    Press & hold the Volume down button. While holding Volume down, press & hold the Power button until the phone turns on. You'll see the word "Start" with an arrow around it.
    Press the Volume down button until you highlight "Recovery mode."
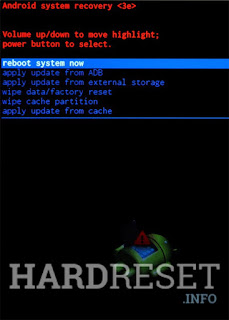
    Press the Power button to start recovery mode. You'll see an image of an Android robot with a red exclamation mark (you may also see "No command").
    Press & hold the Power button. While holding Power, press the Volume up button once. Then release the Power button.
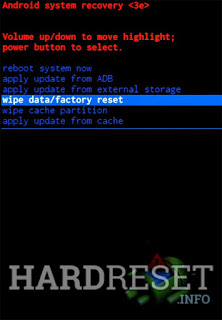
    Press the Volume down button until you highlight "Wipe data/factory reset." Then press the Power button.
    Press the Volume down button until you highlight "Yes" (or "Yes - delete all user data"). Then press the Power button to select it.
    After the reset is complete, press the Power button to select "Reboot system now."
    When you're done, restore your data.

Google Nexus 7 Tablet: Hard Reset or Reboot

Google Nexus 7 Tablet: Hard Reset or Reboot


Performing a reset is the ideal way to reboot your unresponsive Nexus tablet. This tech-recipe tutorial describes the various reset and reboot options

A poorly behaving application can bring your Nexus tablet to a crawl or even freeze the device entirely. Often a simple soft reset or reboot will restore your device to normal function. If not, wiping the device through a hard reset is required.

Soft Reset or Reboot

A simple reboot is the unlikely to cause data loss. This is the safest procedure and should always be tried first.

Just hold down the power button for several seconds. Continue to hold down the power button until the screen blinks off and the boot logo appears.

Hard Reset or Wipe via Menu

If a simple reboot does not restore your system or if you wish to wipe it completely to start fresh, a hard reset is your best option. This will remove all data on your device. Most of your information should be backed up into your online Google account. However, to be safe, backing up to your computer is also recommended. Your applications can be downloaded again from the Google Play store.

1. Select the Settings icon.

2. Click Backup and reset under the Personal section.


3. Be sure that your Backup account and Back up by data options have been enabled and that your data is saved.

4. Select Factory data reset. You may need to confirm with your password if enabled.


Google Nexus 7 Tablet: Hard Reset or Reboot

Performing a reset is the ideal way to reboot your unresponsive Nexus tablet. This tech-recipe tutorial describes the various reset and reboot options

A poorly behaving application can bring your Nexus tablet to a crawl or even freeze the device entirely. Often a simple soft reset or reboot will restore your device to normal function. If not, wiping the device through a hard reset is required.

Soft Reset or Reboot

A simple reboot is the unlikely to cause data loss. This is the safest procedure and should always be tried first.

Just hold down the power button for several seconds. Continue to hold down the power button until the screen blinks off and the boot logo appears.

Hard Reset or Wipe via Menu

If a simple reboot does not restore your system or if you wish to wipe it completely to start fresh, a hard reset is your best option. This will remove all data on your device. Most of your information should be backed up into your online Google account. However, to be safe, backing up to your computer is also recommended. Your applications can be downloaded again from the Google Play store.

1. Select the Settings icon.

2. Click Backup and reset under the Personal section.

select backup reset

3. Be sure that your Backup account and Back up by data options have been enabled and that your data is saved.

4. Select Factory data reset. You may need to confirm with your password if enabled.


Hard Reset via Hardware
If your device is completely unresponsive, you still have one additional option.

1. Press the power button and both volume keys for several seconds. The computer screen will eventually blink off. Continue to hold until you see the Android recovery logo and the large Start selection at the top of the screen.

2. Move the volume keys up and down to see the menu selections. If you don’t want to factory reset, you can try to Power down or to Restart bootloader from these selections. The power key will select the option.

3. If you are forced or desire to factory reset and wipe the device, select Recovery Mode. Your device will reboot. This reboot will be much slower than normal.

4. When you see the Android with red triangle, hold the power button down and press the volume up key until the wipe data/factory reset option appears. Press the power button to select it. Remember that this will erase all the data on your device.

5. With the volume keys select Yes – erase all user data and again press the power button to select this option.


How to factory reset the Nexus 7

How to factory reset the Nexus 7 (2013) for better performance


The Nexus 7 (2013) is a great little tablet, but over time - like any device - it can suffer from problems as a result of misbehaving apps and the digital wear and tear of everyday use. This is especially true if you’re prone to installing and uninstalling stacks of apps. The results can be erratic behavior, slow performance, or both. Sometimes the best way to address those issues is to give your Nexus the electronic equivalent of a swift kick up the binary backside. With factory resetting or hard resetting your Nexus 7, you can restore it to peak performance and get rid of annoying crashes and other irritations. Here’s how to factory reset the Nexus 7 (2013).

What to do before you reset the Nexus 7 (2013)

Backup, backup, backup: if it’s important to you, make sure you’ve got a backup copy somewhere safe before you reset your Nexus 7 (2013). Also make sure you’ve got a note of any crucial app passwords, because post-reset you’ll need to set them up again. Also, make sure you’ve synced with your Google account so that all the online data Google has for your tablet is up to date. That’ll make restoring your Nexus much simpler.

Hard reset and factory reset. What’s the difference?
There are two ways to reset your Nexus 7 (2013). The first option is a Factory Reset, and the second is a Hard Reset. So what’s the difference? A Factory Reset erases all of the data from your device, and while any data stored in your Google Account will be restored, all of your additional apps and their data will be removed. A Factory Reset shouldn’t touch any data stored on the internal SD Card, but a Hard Reset will wipe that too. Factory Reset is called from the Settings menu, while a Hard Reset is carried out in Recovery Mode.

Whichever option you go for, make sure your device is fully charged. You don’t want your Nexus running out of power halfway through a crucial part of the reset process.


When you should reset your Nexus 7 (2013)
We’d recommend resetting your Nexus if it’s messing you about, and it isn’t a bad idea to do it if you’re selling or giving away your tablet. It’s worth bearing in mind that if you’re a spy and use your Nexus for all kinds of secret stuff, it’s still possible to recover some of your data using recovery software. If that’s a concern, invest in a secure wipe app to cover your tracks.

How to reset the Nexus 7 (2013) using the Settings menu (factory reset)


    Open Settings
    Under Personal, tap on Backup & Reset
    Under Personal Data, tap on Factory Data Reset
    Tap on Reset Tablet
    Enter your PIN, pattern or password if prompted
    Tap Delete Everything
    Reboot your Nexus


How to reset the Nexus 7 (2013) in Recovery Mode (hard reset)

There are a few key issues to bear in mind before you do this. If you’ve reset your Google account password, you can’t do a factory reset for 72 hours after the change. And on Android 5.1 onwards, there’s a security setting that means you can’t re-activate a reset Nexus 7 without providing your Google username and password immediately after the device resets. Here’s how reset the device, straight from the Google mouth:

    Turn off the Nexus
    Press and hold Volume Down and then press and hold Power until the tablet turns on. You should see the word “start”
    Press Volume Down twice to highlight Recovery Mode. Press Power to confirm your selection
    Hold down the Power button and press and release the Volume Up button once
    Press Volume Down twice to highlight Wipe Data / Factory Reset and press Power to confirm
    Press Volume Down seven times to highlight Yes - Erase All User Data. Once again, press Power to confirm
    After the reset is finished, reboot your device.

If your Nexus appears to lock up during any of these steps, you can restart it by pressing and holding Power for a few seconds.

Sunday, 5 June 2016

free download nokia secret codes and tricks pdf

free download Nokia secret codes and tricks pdf


how to hard reset nokia phon

Today i am going to introduce you some of secret codes in Nokia mobile phone, Some of them you know it but some you
don't know them but the important of it is for these who dosnt know them at all.

all we are doing here is not a new thing but new for others who don't know because these codes invaded since
2001 for Nokia users, still up to date some people dos not know about it.

DOWNLOAD THE PDF HERE

know without any wasting of time let us begin with dialing:

*#06# for checking the IMEI number (international Mobile Equipment identity)

*#7780# reset to the factory settings. i.e formatting code

*#6770566# This will clear the LCD display (operator logo)

*#0000# To view software version.

*#2820# Bluetooth device address.

*#746025625# Sim clock allowed status.

*#62209526# Display the MAC address of the WLAN adapter. This is available only in the newer devices that support
WLAN like N80 etc.

#pw+1234567890+1# Show if sim have restriction.


*#92702689# takes you to a secret menu where you may find some of the information
below.

1. Display Serial number.
2. Display the Month and year of manufacture
3. Displays (if there) the date where the phone was purchased (MMYY)
4. Display the date of the last repair-if found (0000)
5. shows life time of phone (time passes since last start)
6. The serial number must start with 35 and 15 digits in number.

*#3370# Enhanced full rate codec (EFR) activation. increase signal strength, better signal reception.
it also help if you want use GPRS and the service is not responding or too slow.
Phone battery will automatically restart. increase battery life by 30% because phone receive less
signal from Network.

*#4720# Half rate codec activation.

*#4720* half rate codec deactivation. The phone will automatic restart to apply changes.

If you forgot wallet code for Nokia S60 phone, use this code reset:

*#7370925538#
NOTE: Your data in the wallet will be erased. phone will ask you the lock code
default lock codes is 12345 but if you change it you will not use the default use the current lock code.

press *#3925538# to delete the contents and code of wallet.

*#7328748263373738# reset security code
Default security cod is 12345

Unlock service provider: insert sim turn phone on and press volume up (arrow keys) for three second, should say pin
code. press c, then press * message should flash press * again and 04*pin*pin#
change closed caller group (settings>security setting>user groups) to 00000 and your mobile phone will sound the message tone
when you are near a radar speed trap. Setting it to 500 will cause your phone to set off security alarm
at shop exits,gr8 for practical jokes jokes. (works with some of the Nokia mobile phones.)
press and hold (0) on the main screen to open wap browser or homepage browser.

*#92702689# takes you to a secret menu where you may find some of the information
below.

1. Display Serial number.
2. Display the Month and year of manufacture
3. Displays (if there) the date where the phone was purchased (MMYY)
4. Display the date of the last repair-if found (0000)
5. shows life time of phone (time passes sincet start)
6. The serial number must start with 35 and 15 digits in number

Wednesday, 1 June 2016

HOW TO HARD RESET TECNO P5

HOW TO HARD RESET TECNO P5


ITs simple and easy just make sure you backup all your data such as contact, music, photos, memos/notes, videos, applications and games in your memory card to prevent data loose.

make sure your battery is fully charging because low power may course software broke, when your software braking you smart android phone will automatically dead which means you must flash it with computer.

how to hard reset tecno p5 and imei writing
now here we are, turn off your smart mobile phone
press and hold volume dawn + power  at thesame time untill you see android logo release the following buttons power key + volume down key use the volume down to navigate, scroll down to were you see rest factory or factory reset, use the power key to select scroll down down down to yes click there
if the process finish wipe caches then reboot.

be patient and wait the phone to complete boot then set your prepared language then next, skips the wireless test then next thats how you continued untill you see home screen appear

NOTE: first boot may take at-list 20 to 30 minutes depending on your phone speed performances    

Turn it off and insert your simcard and mmc (memory card) power ON dial *06# on your dial pad if you see IMEI.null or Invalid IMEI you got problem which means you can not make calls, because imei  miss

Whats IMEI?
IMEI means International Mobile Equipment Identity.
how to write International Mobile Equipment Identity (IMEI) now download mtk engineer Here
install the application run it the select you will see two option Android and MTK SETTINGS select mtk setting, swipe left scroll down to cds information navigate to radio naw select sim 1 or 2 it will take you there see the picture below.

how to change imei using mtk engineering


Tecno imei write


in the type tab type any number once then delete it you will see the pop up windows like this then select the first one, in the position (") insert your 15 imei digits example ( '350976223091204' ) then take a look between (+ make single space here EGMR) then send at command.
that how you will do for second sim NOTE: for sim 2 if the windows pop up select the second one not first one.

 how to write mtk imei

congratulation you successfully hard reset your android smart phone and successfully write IMEI .


Monday, 30 May 2016

SAMSUMG GALAXY J7 HARDRESET

SAMSUMG GALAXY J7 HARDRESET

  1. At first switch off the cell phone by holding down the Power key for a short while.
 

2.  Now press and hold together: Volume Up + Home + Power button for a couple of seconds.

3. You should relese held keys when the Samsung Logo appears on the screen.

4. Then select from Recovery Mode menu "wipe data / factory reset" using Volume buttons to navigate and Home button to confirm.


Factory Data Reset (Powered Off) - Nokia Lumia 822 | Verizon Wireless

 Factory Data Reset (Powered Off) - Nokia Lumia 822 | Verizon Wireless


A factory data (hard) reset may help with a blank or frozen screen, apps crashing or freezing, keypad/touchscreen problems, can't hear, device making noises, can't make or receive calls, and device won't sync.

Warning Warnings:

    Perform a factory data reset only if absolutely necessary as it removes all data including:
        Microsoft account
        System and app data
        App settings
        Downloaded apps
        Media (Music, pictures and videos, etc.)
    This reset requires at least 50% battery level if not connected to an external power source and 20% or more if connected.

Note: An alternate reset method is available if the device can be powered on and is responsive.

    1. Ensure the device is powered off.
   2.  Press and hold the Volume Down button (located on the right edge) until instructed to release in step 4.
   3.  Press and hold the Power button (located on the right edge) until the device vibrates (approximately 2 seconds) then release.

    Note Alternatively, connect the device to an approved USB charger while continuing to hold the Volume Down button.

    When the restore screen appears (exclamation mark), release the Volume Down button.


    From the restore screen, press then release the following buttons to initiate the reset process:
press the following keys below:

        Volume Up
        Volume Down
        Power
        Volume down


  Note Allow several minutes for the process to complete (rotating gears appear on the display to indicate the reset is in progress).


  Note To set up the device after the reset has completed, refer to Initial Activation and Setup.
Factory Data Reset (Powered Off) - Nokia Lumia 822 | Verizon WirelessFactory Data Reset (Powered Off) - Nokia Lumia 822 | Verizon WirelessFactory Data Reset (Powered Off) - Nokia Lumia 822 | Verizon WirelessFactory Data Reset (Powered Off) - Nokia Lumia 822 | Verizon WirelessFactory Data Reset (Powered Off) - Nokia Lumia 822 | Verizon WirelessFacto

Factory Data Reset (Powered Off) - Nokia Lumia 822 | Verizon WirelessFactory Data Reset (Powered Off) - Nokia Lumia 822 | Verizon WirelessFactory Data Reset (Powered Off) - Nokia Lumia 822 | Verizon WirelessFactory Data Reset (Powered Off) - Nokia Lumia 822 | Verizon WirelessFactory Data Reset (Powered Off) - Nokia Lumia 822 | Verizon WirelessFactory Data Reset (Powered Off) - Nokia Lumia 822 | Verizon WirelessFactory Data Reset (Powered Off) - Nokia Lumia 822 | Verizon WirelessFactory Data Reset (Powered Off) - Nokia Lumia 822 | Verizon Wireless

Factory Data Reset (Powered Off) - Nokia Lumia 822 | Verizon WirelessFactory Data Reset (Powered Off) - Nokia Lumia 822 | Verizon WirelessFactory Data Reset (Powered Off) - Nokia Lumia 822 | Verizon WirelessFactory Data Reset (Powered Off) - Nokia Lumia 822 | Verizon WirelessFactory Data Reset (Powered Off) - Nokia Lumia 822 | Verizon WirelessFactory Data Reset (Powered Off) - Nokia Lumia 822 | Verizon WirelessFactory Data Reset (Powered Off) - Nokia Lumia 822 | Verizon WirelessFactory Data Reset (Powered Off) - Nokia Lumia 822 | Verizon WirelessFactory Data Reset (Powered Off) - Nokia Lumia 822 | Verizon WirelessFactory Data Reset (Powered Off) - Nokia Lumia 822 | Verizon Wireless

Factory Data Reset (Powered Off) - Nokia Lumia 822 | Verizon WirelessFactory Data Reset (Powered Off) - Nokia Lumia 822 | Verizon WirelessFactory Data Reset (Powered Off) - Nokia Lumia 822 | Verizon WirelessFactory Data Reset (Powered Off) - Nokia Lumia 822 | Verizon WirelessFactory Data Reset (Powered Off) - Nokia Lumia 822 | Verizon WirelessFactory Data Reset (Powered Off) - Nokia Lumia 822 | Verizon WirelessFactory Data Reset (Powered Off) - Nokia Lumia 822 | Verizon WirelessFactory Data Reset (Powered Off) - Nokia Lumia 822 | Verizon WirelessFactory Data Reset (Powered Off) - Nokia Lumia 822 | Verizon WirelessFactory Data Reset (Powered Off) - Nokia Lumia 822 | Verizon WirelessFactory Data Reset (Powered Off) - Nokia Lumia 822 | Verizon Wireless

Factory Data Reset (Powered Off) - Nokia Lumia 822 | Verizon WirelessFactory Data Reset (Powered Off) - Nokia Lumia 822 | Verizon WirelessFactory Data Reset (Powered Off) - Nokia Lumia 822 | Verizon WirelessFactory Data Reset (Powered Off) - Nokia Lumia 822 | Verizon WirelessFactory Data Reset (Powered Off) - Nokia Lumia 822 | Verizon WirelessFactory Data Reset (Powered Off) - Nokia Lumia 822 | Verizon WirelessFactory Data Reset (Powered Off) - Nokia Lumia 822 | Verizon WirelessFactory Data Reset (Powered Off) - Nokia Lumia 822 | Verizon WirelessFactory Data Reset (Powered Off) - Nokia Lumia 822 | Verizon WirelessFactory Data Reset (Powered Off) - Nokia Lumia 822 | Verizon WirelessFactory Data Reset (Powered Off) - Nokia Lumia 822 | Verizon WirelessFactory Data Reset (Powered Off) - Nokia Lumia 822 | Verizon WirelessFactory Data Reset (Powered Off) - Nokia Lumia 822 | Verizon Wireless

Factory Data Reset (Powered Off) - Nokia Lumia 822 | Verizon WirelessFactory Data Reset (Powered Off) - Nokia Lumia 822 | Verizon WirelessFactory Data Reset (Powered Off) - Nokia Lumia 822 | Verizon WirelessFactory Data Reset (Powered Off) - Nokia Lumia 822 | Verizon WirelessFactory Data Reset (Powered Off) - Nokia Lumia 822 | Verizon WirelessFactory Data Reset (Powered Off) - Nokia Lumia 822 | Verizon WirelessFactory Data Reset (Powered Off) - Nokia Lumia 822 | Verizon WirelessFactory Data Reset (Powered Off) - Nokia Lumia 822 | Verizon WirelessFactory Data Reset (Powered Off) - Nokia Lumia 822 | Verizon WirelessFactory Data Reset (Powered Off) - Nokia Lumia 822 | Verizon WirelessFactory Data Reset (Powered Off) - Nokia Lumia 822 | Verizon WirelessFactory Data Reset (Powered Off) - Nokia Lumia 822 | Verizon WirelessFactory Data Reset (Powered Off) - Nokia Lumia 822 | Verizon WirelessFactory Data Reset (Powered Off) - Nokia Lumia 822 | Verizon WirelessFactory Data Reset (Powered Off) - Nokia Lumia 822 | Verizon WirelessFactory Data Reset (Powered Off) - Nokia Lumia 822 | Verizon Wireless

Factory Data Reset (Powered Off) - Nokia Lumia 822 | Verizon WirelessFactory Data Reset (Powered Off) - Nokia Lumia 822 | Verizon WirelessFactory Data Reset (Powered Off) - Nokia Lumia 822 | Verizon WirelessFactory Data Reset (Powered Off) - Nokia Lumia 822 | Verizon WirelessFactory Data Reset (Powered Off) - Nokia Lumia 822 | Verizon WirelessFactory Data Reset (Powered Off) - Nokia Lumia 822 | Verizon WirelessFactory Data Reset (Powered Off) - Nokia Lumia 822 | Verizon WirelessFactory Data Reset (Powered Off) - Nokia Lumia 822 | Verizon WirelessFactory Data Reset (Powered Off) - Nokia Lumia 822 | Verizon WirelessFactory Data Reset (Powered Off) - Nokia Lumia 822 | Verizon WirelessFactory Data Reset (Powered Off) - Nokia Lumia 822 | Verizon WirelessFactory Data Reset (Powered Off) - Nokia Lumia 822 | Verizon WirelessFactory Data Reset (Powered Off) - Nokia Lumia 822 | Verizon WirelessFactory Data Reset (Powered Off) - Nokia Lumia 822 | Verizon WirelessFactory Data Reset (Powered Off) - Nokia Lumia 822 | Verizon WirelessFactory Data Reset (Powered Off) - Nokia Lumia 822 | Verizon WirelessFactory Data Reset (Powered Off) - Nokia Lumia 822 | Verizon WirelessFactory Data Reset (Powered Off) - Nokia Lumia 822 | Verizon Wireless

Factory Data Reset (Powered Off) - Nokia Lumia 822 | Verizon WirelessFactory Data Reset (Powered Off) - Nokia Lumia 822 | Verizon WirelessFactory Data Reset (Powered Off) - Nokia Lumia 822 | Verizon WirelessFactory Data Reset (Powered Off) - Nokia Lumia 822 | Verizon WirelessFactory Data Reset (Powered Off) - Nokia Lumia 822 | Verizon WirelessFactory Data Reset (Powered Off) - Nokia Lumia 822 | Verizon WirelessFactory Data Reset (Powered Off) - Nokia Lumia 822 | Verizon WirelessFactory Data Reset (Powered Off) - Nokia Lumia 822 | Verizon WirelessFactory Data Reset (Powered Off) - Nokia Lumia 822 | Verizon WirelessFactory Data Reset (Powered Off) - Nokia Lumia 822 | Verizon WirelessFactory Data Reset (Powered Off) - Nokia Lumia 822 | Verizon WirelessFactory Data Reset (Powered Off) - Nokia Lumia 822 | Verizon WirelessFactory Data Reset (Powered Off) - Nokia Lumia 822 | Verizon WirelessFactory Data Reset (Powered Off) - Nokia Lumia 822 | Verizon WirelessFactory Data Reset (Powered Off) - Nokia Lumia 822 | Verizon WirelessFactory Data Reset (Powered Off) - Nokia Lumia 822 | Verizon WirelessFactory Data Reset (Powered Off) - Nokia Lumia 822 | Verizon WirelessFactory Data Reset (Powered Off) - Nokia Lumia 822 | Verizon WirelessFactory Data Reset (Powered Off) - Nokia Lumia 822 | Verizon WirelessFactory Data Reset (Powered Off) - Nokia Lumia 822 | Verizon WirelessFactory Data Reset (Powered Off) - Nokia Lumia 822 | Verizon WirelessFactory Data Reset (Powered Off) - Nokia Lumia 822 | Verizon Wireless

Factory Data Reset (Powered Off) - Nokia Lumia 822 | Verizon WirelessFactory Data Reset (Powered Off) - Nokia Lumia 822 | Verizon WirelessFactory Data Reset (Powered Off) - Nokia Lumia 822 | Verizon WirelessFactory Data Reset (Powered Off) - Nokia Lumia 822 | Verizon WirelessFactory Data Reset (Powered Off) - Nokia Lumia 822 | Verizon WirelessFactory Data Reset (Powered Off) - Nokia Lumia 822 | Verizon WirelessFactory Data Reset (Powered Off) - Nokia Lumia 822 | Verizon WirelessFactory Data Reset (Powered Off) - Nokia Lumia 822 | Verizon WirelessFactory Data Reset (Powered Off) - Nokia Lumia 822 | Verizon WirelessFactory Data Reset (Powered Off) - Nokia Lumia 822 | Verizon Wireless

Factory Data Reset (Powered Off) - Nokia Lumia 822 | Verizon WirelessFactory Data Reset (Powered Off) - Nokia Lumia 822 | Verizon WirelessFactory Data Reset (Powered Off) - Nokia Lumia 822 | Verizon Wireless

Factory Data Reset (Powered Off) - Nokia Lumia 822 | Verizon WirelessFactory Data Reset (Powered Off) - Nokia Lumia 822 | Verizon WirelessFactory Data Reset (Powered Off) - Nokia Lumia 822 | Verizon WirelessFactory Data Reset (Powered Off) - Nokia Lumia 822 | Verizon WirelessFactory Data Reset (Powered Off) - Nokia Lumia 822 | Verizon Wireless